After watching Youtube video's (again and again, with much bla bla bla...) I created this page as a kind of 'fast reference' to what I did to get Klipper working. This will make life easier when Klipper gets an update and you have to repeat some steps or when things go wrong and you have to do the whole thing again. This page is NOT DUMMY proof, you need some experience (Linux) !! The HDMI7 screen is "plug and play", so nothing to do for it.
Once you have things working or when you feel 'lets make a backup now' make a SdCard backup using Win32DiskImager. Keep several backups so you can revert to a 'working' version because some updates take time.
This page is started with the change on 26 june 2024 and updated on december 2024, still work in progress... - initial version 26 june 2024
- tried Pi2 with SSD.
- added ADXL345 20 july 2024
- added BlTouch 6 august 2024
- added KIAUH, some text changes 9 august 2024
- added Sensorless Homing, 5 september 2024
- added kTAVM oktober 2024
- work in progress... Tool Changer https://www.youtube.com/watch?v=vhIco5Yiz5U for 2 toolheads
- added macros te determine the offsets for probe or toolhead (extruder1 T1) 22 december 2024
BootTime in mm:ss from Power Off to both screens displaying the printer status:
BTT PI V1.2 : 2:24 , HDMI7 was on at 2:00, RepRap at 2:24, after an update it is now 2:15 , HDMI7 was on at 1:45, RepRap at 2:15
BTT PI 2 (SdCard) : tbd
BTT PI 2 (eMMC) : tbd
BTT PI 2 (NVMe) : tbd

ToDo:
- Add belt tensioners. Currently the belts may have different tensions although they sound 'the same'.
Useful links:
- READ THE DISCLAIMER There is always a change that things go wrong...
Do not skip lines unless you know what you are doing. - BigTreeTech on Github with manuals, software, etc. https://github.com/bigtreetech?tab=repositories
- BTT PI V1.2, https://github.com/bigtreetech/cb1
Page has a link to Debian image, with Klipper pre-installed. - BTT PI2, https://github.com/bigtreetech/CB2
Faster the V1.2, has on board 32Gb fast memory (replaces the SdCard and is 10 times faster), standard NVMe 2242 support (PCle 2.1 1x1 lane), Display (DSI) and Camera (CSI2) supprt, Wifi 2.4 & 5 Ghz etc . Page has a link to Debian image, with Klipper pre-installed. - Klipper Installation, https://www.klipper3d.org/Installation.html
- Installing Klipper on SKR3 EZ, https://www.ifixit.com/Guide/4.+Installing+Klipper+on+SKR3+EZ/152185
- Setting Up BTT ADXL345 & S2DW Accelerometers with Klipper, https://www.youtube.com/watch?v=FBWj8q5e6Wo
- Ellis Print tuning guide, https://ellis3dp.com/Print-Tuning-Guide/
- Klipper Basics - BIGTREETECH Pi V1.2, https://www.youtube.com/watch?v=00U-w6tXq-o
- Klipper discourse group, https://klipper.discourse.group/
- How to Read and Analyze Input Shaper Graphs Generated by Klipper, https://www.youtube.com/watch?v=M-yc_XM8sP4&t=168s
- Easy updating of all sodtware on the PI: KIAUH at https://github.com/dw-0/kiauh, See "Download and use KIAUH".
- ToDo kTAVM, https://github.com/TypQxQ/kTAMV
- ,
Required freeware tools on Windows:
- PuTTY, https://www.putty.org/
- WinSCP, https://winscp.net/eng/index.php
- Balena etcher, https://etcher.balena.io/
- Win32DiskImager, https://win32diskimager.org/
- Brave browser for a free ads-free Youtube, https://brave.com/
Backup existing data of Marlin and OctoPrint
Just in case Klipper is a disapointment and you want to go back- Use the M503 command, via OctoPrint, to retrieve the settings used by Marlin. Save them in a file.
Or go through the advanced Marlin menus and take photos with your phone. - Make a backup of SdCard with OctoPrint using Win32DiskImager.
Setup SdCard
A SdCard of 16Gb is enough.- Download Debian image.xz for the PI
- Burn image.xz with Balena etcher on SdCard
- Edit WiFi settings on SdCard as described on https://github.com/bigtreetech/cb1
- Insert SdCard in the PI and power On
- Change the passwords for users: root and biqu.
Login (as root or biqu) on the Pi from Windows using PuTTY and change (and remenber) the password using Linux command "passwd".
Klipper Files
Prepare, with PuTTY logged in on the Pi
The ip-address of the PI can be found in your routers client list.
login as: biqu
biqu@192.168.35.3's password: biqu
 ____ _____ _____      ____ ____  _
| __ )_   _|_   _|    / ___| __ )/ |
|  _ \ | |   | |_____| |   |  _ \| |
| |_) || |   | |_____| |___| |_) | |
|____/ |_|   |_|      \____|____/|_|

Welcome to BTT-CB1 2.3.4 Bullseye with Linux 5.16.17-sun50iw9

System load:   32%              Up time:       7:33
Memory usage:  22% of 986M      IP:            192.168.35.3
CPU temp:      53°C             Usage of /:    29% of 15G

Last login: Fri Jul  5 16:23:58 2024 from 192.168.35.131
biqu@BTT-CB1:~$

# Change passwords !!!!
sudo passwd

biqu@BTT-CB1:~$ passwd
Changing password for biqu.
Current password: biqu
New password:
Retype new password:
passwd: password updated successfully

biqu@BTT-CB1:~$ su
Password:
root@bigtreetech-cb2:/home/biqu# passwd
New password: root
Retype new password:
passwd: password updated successfully
biqu@BTT-CB1:~$
exit

# Update the Linux software:
biqu@BTT-CB1:~$ sudo apt update
biqu@BTT-CB1:~$ sudo apt upgrade

# Check all block devices with name, type, size and model
biqu@BTT-CB1:~$  lsblk -io NAME,TYPE,SIZE,MODEL
NAME        TYPE   SIZE MODEL
mmcblk1     disk  14.9G                       # SdCard with 2 partions
|-mmcblk1p1 part   256M
`-mmcblk1p2 part  14.7G
zram0       disk 493.5M
zram1       disk    50M

# Or try: sfdisk -l

# For the ADXL345 do
biqu@BTT-CB1:~$ sudo apt install python3-numpy python3-matplotlib libatlas-base-dev libopenblas-dev
biqu@BTT-CB1:~$ ~/klippy-env/bin/pip install -v numpy

# Check the plugged-in USB devices
biqu@BTT-CB1:~$ lsusb
Bus 008 Device 002: ID 1d50:614e OpenMoko, Inc. rp2040                 // BTT ADXL345
Bus 008 Device 001: ID 1d6b:0001 Linux Foundation 1.1 root hub
Bus 004 Device 001: ID 1d6b:0002 Linux Foundation 2.0 root hub
Bus 007 Device 002: ID 1d50:614e OpenMoko, Inc. stm32h723xx            // BTT SKR 3 EZ
Bus 007 Device 001: ID 1d6b:0001 Linux Foundation 1.1 root hub
Bus 003 Device 001: ID 1d6b:0002 Linux Foundation 2.0 root hub
Bus 006 Device 001: ID 1d6b:0001 Linux Foundation 1.1 root hub
Bus 002 Device 001: ID 1d6b:0002 Linux Foundation 2.0 root hub
Bus 005 Device 002: ID 04d9:8030 Holtek Semiconductor, Inc. BTT-HDMI7  // Nothing todo for this device !!
Bus 005 Device 001: ID 1d6b:0001 Linux Foundation 1.1 root hub
Bus 001 Device 001: ID 1d6b:0002 Linux Foundation 2.0 root hub

# Check the USB devices. If /dev/serial is not present (Its a Debian bug) then "Update the Linux software" !!!
biqu@BTT-CB1:~$ ls -las /dev/serial/by-id/*
0 lrwxrwxrwx 1 root root 13 Jul  4 06:30 /dev/serial/by-id/usb-Klipper_rp2040_btt_acc-if00 -> ../../ttyACM1
0 lrwxrwxrwx 1 root root 13 Jul  4 06:30 /dev/serial/by-id/usb-Klipper_stm32h723xx_320042001851313238353730-if00 -> ../../ttyACM0

# Set the time zone because the Klipper page in the webbrowser and on the HDMI displayed the time in different timezones.
biqu@BTT-CB1:~$ timedatectl
               Local time: Tue 2024-07-09 14:09:18 UTC
           Universal time: Tue 2024-07-09 14:09:18 UTC
                 RTC time: Fri 1970-01-02 04:57:51
                Time zone: Etc/UTC (UTC, +0000)
System clock synchronized: yes
              NTP service: n/a
          RTC in local TZ: no
biqu@BTT-CB1:~$ timedatectl list-timezones
...
Europe/Brussels
...
biqu@BTT-CB1:~$ sudo timedatectl set-timezone Europe/Brussels
biqu@BTT-CB1:~$ timedatectl
               Local time: Tue 2024-07-09 16:13:34 CEST
           Universal time: Tue 2024-07-09 14:13:34 UTC
                 RTC time: Fri 1970-01-02 05:01:31
                Time zone: Europe/Brussels (CEST, +0200)
System clock synchronized: yes
              NTP service: n/a
          RTC in local TZ: no
# On the HDMI7 select: Power icon (left lower corner) -> Restart KlipperScreen

#
##### Security  !!!
#
# Read https://docs.mainsail.xyz/overview/quicktips/remote-access
# Read https://forum.vorondesign.com/threads/protect-your-klipper-printer-mainsail-password-ssl-firewall-rules.469/ .
#
# HTTPS can result in a block, by the Windows firewall, of the Mainsail page due to a self-signed ssl sertificate.
#
#####

# Compiling Klipper always in the klipper directory.
biqu@BTT-CB1:~$ cd klipper
biqu@BTT-CB1:~/klipper$ make clean      # Optional, clean: remove whatever was compiled in the past
How to compile all, with PuTTY logged in on the Pi
- for Linux (BTT PI):
biqu@BTT-CB1:$ cd ~/klipper biqu@BTT-CB1:~/klipper$ make menuconfig(Top)Klipper FirmwareConfiguration [*] Enable extra low-level configuration options Micro-controller Architecture (Linux process) ---> () GPIO pins to set at micro-controller startup# Quit (prompts for save)and save biqu@BTT-CB1:~/klipper$ sudo service klipper stop biqu@BTT-CB1:~/klipper$ make biqu@BTT-CB1:~/klipper$ make flash biqu@BTT-CB1:~/klipper$ sudo service klipper start - for SKR 3 EZ (check the STM32 chip on the board for the correct processor model)
biqu@BTT-CB1:$ cd ~/klipper biqu@BTT-CB1:~/klipper$ make menuconfig(Top)Klipper Firmware[*] Enable extra low-level configuration options Micro-controller Architecture (STMicroelectronics STM32) ---> Processor model (STM32H723) ---> Bootloader offset (128KiB bootloader) ---> Clock Reference (25 MHz crystal) ---> Communication interface (USB (on PA11/PA12)) ---> USB ids ---> () GPIO pins to set at micro-controller startup# Quit (prompts for save)and save biqu@BTT-CB1:~/klipper$ make # When make finishes on Windows PC: Open WINSCP # Navigate to /klipper/out/ # Copy klipper.bin to your PC and rename it to firmware.bin # Copy firmware.bin to a SdCard. # Put the SdCard in the SKR 3 EZ # Push reset button. # When the status LED on the board goes out the firmware update is complete. # Remove the SD card. On the SdCard firmware.bin is now named FIRMWARE.CUR - for BTT ADXL345
# Put ADXL345 in boot mode: # - Remove USB cable if already inserted. # - Press and hold button on ADSL345 and then insert USB cable # - Login to PI # If the PI is not prepared for the ADXL345 do first biqu@BTT-CB1:$ sudo apt update biqu@BTT-CB1:$ sudo apt install python3-numpy python3-matplotlib libatlas-base-dev libopenblas-dev biqu@BTT-CB1:$ ~/klippy-env/bin/pip install -v numpy biqu@BTT-CB1:$ cd ~/klipper biqu@BTT-CB1:~/klipper$ lsusb Bus 008 Device 003: ID 2e8a:0003 Raspberry Pi RP2 Boot <-------- Raspberry Pi RP2 = ADXL345 , ID and in boot mode !!! Bus 008 Device 001: ID 1d6b:0001 Linux Foundation 1.1 root hub Bus 004 Device 001: ID 1d6b:0002 Linux Foundation 2.0 root hub Bus 007 Device 002: ID 1d50:614e OpenMoko, Inc. stm32h723xx Bus 007 Device 001: ID 1d6b:0001 Linux Foundation 1.1 root hub Bus 003 Device 001: ID 1d6b:0002 Linux Foundation 2.0 root hub Bus 006 Device 001: ID 1d6b:0001 Linux Foundation 1.1 root hub Bus 002 Device 001: ID 1d6b:0002 Linux Foundation 2.0 root hub Bus 005 Device 002: ID 04d9:8030 Holtek Semiconductor, Inc. BTT-HDMI7 Bus 005 Device 001: ID 1d6b:0001 Linux Foundation 1.1 root hub Bus 001 Device 001: ID 1d6b:0002 Linux Foundation 2.0 root hub biqu@BTT-CB1:~/klipper$ make menuconfig(Top)Klipper Firmware[*] Enable extra low-level configuration options Micro-controller Architecture (Raspberry Pi RP2040) ---> Bootloader offset (No bootloader) ---> Flash chip (W25Q080 with CLKDIV 2) ---> Communication Interface (USBSERIAL) ---> USB ids ---> () GPIO pins to set at micro-controller startup# Quit (prompts for save) and save biqu@BTT-CB1:~/klipper$ make biqu@BTT-CB1:~/klipper$ make flash FLASH_DEVICE=2e8a:0003 <-------- ID Flashing out/klipper.uf2 to 2e8a:0003 sudo lib/rp2040_flash/rp2040_flash out/klipper.uf2 Loaded UF2 image with 111 pages Found rp2040 device on USB bus 8 address 3 Flashing... Resetting interface Locking Exiting XIP mode Erasing Flashing Rebooting device biqu@BTT-CB1:~/klipper$ lsusb Bus 008 Device 004: ID 1d50:614e OpenMoko, Inc. rp2040 <---------- OK !! Bus 008 Device 001: ID 1d6b:0001 Linux Foundation 1.1 root hub Bus 004 Device 001: ID 1d6b:0002 Linux Foundation 2.0 root hub Bus 007 Device 002: ID 1d50:614e OpenMoko, Inc. stm32h723xx Bus 007 Device 001: ID 1d6b:0001 Linux Foundation 1.1 root hub Bus 003 Device 001: ID 1d6b:0002 Linux Foundation 2.0 root hub Bus 006 Device 001: ID 1d6b:0001 Linux Foundation 1.1 root hub Bus 002 Device 001: ID 1d6b:0002 Linux Foundation 2.0 root hub Bus 005 Device 002: ID 04d9:8030 Holtek Semiconductor, Inc. BTT-HDMI7 Bus 005 Device 001: ID 1d6b:0001 Linux Foundation 1.1 root hub Bus 001 Device 001: ID 1d6b:0002 Linux Foundation 2.0 root hub biqu@BTT-CB1:~/klipper$ ls /dev/serial/by-id/ usb-Klipper_rp2040_454741505B88249A-if00 usb-Klipper_stm32h723xx_320042001851313238353730-if00 # If needed adjust in the ~/klipper/printer_data/config/bigtreetech-ADXL345-usb.cfg file: [mcu btt_adxl345] serial: /dev/serial/by-id/usb-Klipper_rp2040_454741505B88249A-if00
Measuring resonances https://www.klipper3d.org/Measuring_Resonances.html
# Add the following 5 lines to printer.cfg . The results are later writen into this file.

[include bigtreetech-ADXL345-usb.cfg]
[input_shaper]
shaper_freq_x: 0
shaper_freq_y: 0
shaper_type: mzv

# With WinScp put file bigtreetech-ADXL345-usb.cfg in ~/klipper/printer_data/config

# Note X-Axis: On my corexy just the extruder moves on the X-axis (lighter means higher frequency)
# Note Y-axis: On my corexy the x-axis with extruder on it moves over the 2 Y-axis (heavier means lower frequency)

#In the Klipper CONSOLE (Send Code...), give command and wait per command until it finishes:

G28
SHAPER_CALIBRATE AXIS=X
SAVE_CONFIG
G28
SHAPER_CALIBRATE AXIS=Y
SAVE_CONFIG

# Note that the procedure backs up printer.cfg with every SAVE_CONFIG.
# Using PuTTY on Windows login to the PI and give commands:

biqu@BTT-CB1:~$ ls /tmp
calibration_data_x_20240704_174212.csv  systemd-private-ddbd693fd4b1461c85a482ed05e0da69-ntp.service-kyqTng
calibration_data_y_20240704_175459.csv  systemd-private-ddbd693fd4b1461c85a482ed05e0da69-systemd-logind.service-w0FwZg
klipper_host_mcu

biqu@BTT-CB1:~$ ~/klipper/scripts/calibrate_shaper.py /tmp/calibration_data_x_*.csv -o /tmp/shaper_calibrate_x.png --max_smoothing=0.2
Fitted shaper 'zv' frequency = 113.6 Hz (vibrations = 5.0%, smoothing ~= 0.017)
To avoid too much smoothing with 'zv', suggested max_accel <= 50300 mm/sec^2
Fitted shaper 'mzv' frequency = 112.8 Hz (vibrations = 0.7%, smoothing ~= 0.019)
To avoid too much smoothing with 'mzv', suggested max_accel <= 37500 mm/sec^2
Fitted shaper 'ei' frequency = 133.2 Hz (vibrations = 0.0%, smoothing ~= 0.021)
To avoid too much smoothing with 'ei', suggested max_accel <= 33000 mm/sec^2
Fitted shaper '2hump_ei' frequency = 149.8 Hz (vibrations = 0.0%, smoothing ~= 0.028)
To avoid too much smoothing with '2hump_ei', suggested max_accel <= 25000 mm/sec^2
Fitted shaper '3hump_ei' frequency = 149.8 Hz (vibrations = 0.0%, smoothing ~= 0.040)
To avoid too much smoothing with '3hump_ei', suggested max_accel <= 16400 mm/sec^2
Recommended shaper is mzv @ 112.8 Hz

biqu@BTT-CB1:~$ ~/klipper/scripts/calibrate_shaper.py /tmp/calibration_data_y_*.csv -o /tmp/shaper_calibrate_y.png --max_smoothing=0.2
Fitted shaper 'zv' frequency = 71.6 Hz (vibrations = 17.2%, smoothing ~= 0.037)
To avoid too much smoothing with 'zv', suggested max_accel <= 20000 mm/sec^2
Fitted shaper 'mzv' frequency = 64.4 Hz (vibrations = 2.0%, smoothing ~= 0.050)
To avoid too much smoothing with 'mzv', suggested max_accel <= 12200 mm/sec^2
Fitted shaper 'ei' frequency = 75.4 Hz (vibrations = 1.5%, smoothing ~= 0.057)
To avoid too much smoothing with 'ei', suggested max_accel <= 10600 mm/sec^2
Fitted shaper '2hump_ei' frequency = 80.0 Hz (vibrations = 0.0%, smoothing ~= 0.084)
To avoid too much smoothing with '2hump_ei', suggested max_accel <= 7100 mm/sec^2
Fitted shaper '3hump_ei' frequency = 84.4 Hz (vibrations = 0.0%, smoothing ~= 0.115)
To avoid too much smoothing with '3hump_ei', suggested max_accel <= 5200 mm/sec^2
Recommended shaper is mzv @ 64.4 Hz

biqu@BTT-CB1:~$ ls /tmp
calibration_data_x_20240704_174212.csv  moonraker_instance_ids  systemd-private-ddbd693fd4b1461c85a482ed05e0da69-ntp.service-kyqTng
calibration_data_y_20240704_175459.csv  shaper_calibrate_x.png  systemd-private-ddbd693fd4b1461c85a482ed05e0da69-systemd-logind.service-w0FwZg
klipper_host_mcu                        shaper_calibrate_y.png

# Note: the .csv and .png file are removed with a reboot !!
# On Windows download with WinSCP both shaper_calibrate_*.png files.
# For interpretation read: # https://klipper.discourse.group/t/interpreting-the-input-shaper-graphs/9879

# The ADXL345 is not needed anymore, unless you make changes to the printer.
# To disable ADXL345 and remove the USB cable comment out (add '#') in printer.cfg line:  #[include bigtreetech-ADXL345-usb.cfg]
# Restart results in an error so shutdown and power Off - On the printer !!
Backup SdCard with Win32DiskImager
A SdCard warning: later the backup image may not fit the SdCard you want to write it on, even if it is the same size. The reason: the SdCard may have some defect sectors which results in a smaller size or its not from the same manufacturer/type.
- Power off PI and then remove Micro SdCard
- Put Micro SdCard in an SdCard adapter/reader and insert in Windows PC
- Read the image using Win32DiskImager
The image can be restored, with BalenaEtcher, on the SdCard when something goes wrong. Shit happens...
A menu and macro for manual bedtramming
- My Bed tramming macro works just fine with the web interface. See macros.txt for what is needed.

- My Bed tramming macro does not work with the HDMI7 display.

It starts the procedure but then there is no way to advance in the precedure.
Missing is a window with the "Accept", "Adjusted" and "Abort" buttons. Thus it sits at screw1.
Very strange but HDMI7 has its own bed tramming macro under macros which is not available via the web interface...
- The bed tramming menu on the RepRap display, attached to the SKR 3 EZ, works also. See menus.txt .
Added BlTouch and BedMesh
- Source BlTouch, See Youtube PrintsLeo3D https://www.youtube.com/watch?v=5vmjBXvY6BA
- The added weight requires Measuring resonances again !!! The frequencies will be lower.
- Note on MY printer: The x_offset of the BlTouch is +23, it is on the right side of the nozzle.
  Thus left would have been -23. To reach the left side of the bed at +200 the extruder must at
  least be able to reach +223 in mesh_max but after tuning it was to 233 (5 mm from the edge).
  Adjusted [stepper_x] position_max: 224  in bigtreetech-skr-3.cfg
- Either perform bed leveling once every x printe and safe the config and load the bed mesh before every print or
- Bed Level per print but Gcode G29 is not supported by Klipper, so there are 3 ways:
 1. Add a macro to printer.cfg (not tested !!)
   [gcode_macro START_PRINT]
   gcode:
    {% set BED_TEMP = params.BED_TEMP|default(60)|float %}
    M190 S{BED_TEMP}
    G28
    BED_MESH_CALIBRATE

 2. In the Slicer add bed leveling to the printer Start Gcode. Best add lines at the very beginning of the Start Gcode.

 3. Cura only: Add Klipper plug-in "Klipper settings" from yhe market place and use from the added settings
    the Experimental features "Enable Bed Mesh Calibration" which adds to the generated (start) GCODE:

    M190 S82           ;KlipperSettingsPlugin, heat the bed for PETG
    G28                ;KlipperSettingsPlugin, home first
    BED_MESH_CALIBRATE ;KlipperSettingsPlugin

 4. File with added [safe_z_home] [bltouch] and [bed_mesh]: printer.cfg
PI2 ONLY: Klipper without SdCard but using the eMMC
Required is Klipper installed on a SdCard. Then nand-sata-install will install it in the eMMC.
# Open on windows a powershell terminal and login:
Windows PowerShell
Copyright (C) Microsoft Corporation. All rights reserved.

Install the latest PowerShell for new features and improvements! https://aka.ms/PSWindows

PS C:\Users\ZeKitez> ssh 192.168.35.49 -l biqu
biqu@192.168.35.49's password:
 ____  _       _                 _            _        ____ ____ ____
| __ )(_) __ _| |_ _ __ ___  ___| |_ ___  ___| |__    / ___| __ )___ \
|  _ \| |/ _` | __| '__/ _ \/ _ \ __/ _ \/ __| '_ \  | |   |  _ \ __) |
| |_) | | (_| | |_| | |  __/  __/ ||  __/ (__| | | | | |___| |_) / __/
|____/|_|\__, |\__|_|  \___|\___|\__\___|\___|_| |_|  \____|____/_____|
         |___/
Welcome to BTT-CB2_1.0.5_Armbian 23.05.0-trunk Bullseye with Linux 4.19.232-bigtree-cb2

No end-user support: built from trunk

System load:   15%              Up time:       32 min
Memory usage:  15% of 1.94G     IP:            192.168.35.49
CPU temp:      45°C             Usage of /:    20% of 29G
RX today:      4.1 GiB

Last login: Sat Jul 20 16:15:49 2024 from 192.168.35.131
biqu@bigtreetech-cb2:~$
biqu@bigtreetech-cb2:~$ sudo nand-sata-install
[sudo] password for biqu:

# Select option 2 "Boot from eMMC - system in EMMC"

# Press < OK >
# This takes several minutes and at some point it seems that nothing is happening.
# After it is finished shutdown and Power-Off. Remove the SdCard.
# After Power-On and login:
biqu@bigtreetech-cb2:~$ lsblk -io NAME,TYPE,SIZE,MODEL
NAME TYPE SIZE MODEL
mmcblk1 disk 29.1G # eMMC
`-mmcblk1p1 part 28.8G
mmcblk1boot0 disk 4M
mmcblk1boot1 disk 4M
zram0 disk 50M
PI2 ONLY: Without SdCard using an M2 NVMe SSD (2242) of 256GB on the backside of the PI 2.
The PI 2 has a PCle 2.1 1x1 lane connector on the backside. Transcend SSD mounted in the connector.
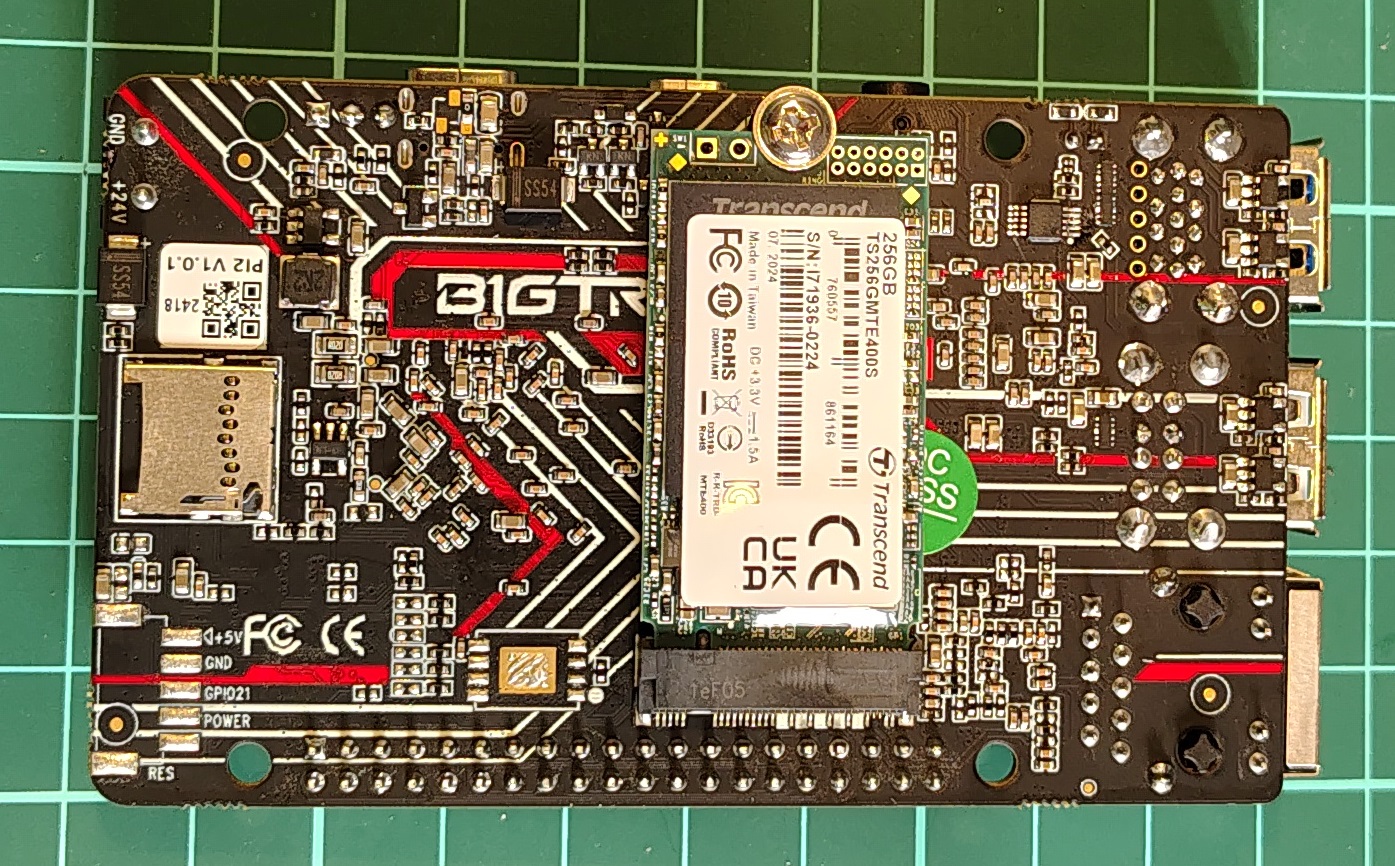
# TBD... Currently the SSD is only mounted...
biqu@bigtreetech-cb2:~$ lsblk -io NAME,TYPE,SIZE,MODEL
NAME TYPE SIZE MODEL
mmcblk1 disk 29.1G
`-mmcblk1p1 part 28.8G
mmcblk1boot0 disk 4M
mmcblk1boot1 disk 4M
zram0 disk 50M
nvme0n1 disk 238.5G TS256GMTE400S # Transcend SSD
Sensorless homing on X and Y with the TMS2209
The SKR 3 EZ uses TMC2209 drivers. A few changes are needed: printer.cfg and bigtreetech-skr-3.cfg, unplugging the X+Y switches and/or removing the switches, adding DIAG jumpers to the X+Y drivers (see user manual board) but NO additional wiring.
Safe_homing, added with the BLTouch, does not go together with the homing_override required for SensorLess Homing but the code of safe homing can be added to the homing_override. SensorLess Homing requires lower current value for the motors and a 'rest' position after the 'home' is detected.
I started with the X-axis and after it worked added the Y-axis but that resulted in re-calibrating the driver_SGTHRS vaule for the X-axis.
Sources:
https://www.klipper3d.org/TMC_Drivers.html?h=sensorless
https://klipper.discourse.group/t/sensorless-homing-macro-suggested-in-klipper-docs/896/4
https://www.reddit.com/r/BIGTREETECH/comments/wmkg4y/skr_3_ez_sensorless_homing/
Files:
printer.cfg
bigtreetech-skr-3.cfg
macros.txt
Magnetic tool changer with OpenScad
- The 1st HotEnd has a fixed mount. The 2nd HotEnd can be adjusted in Z on its mount but it will have a small XY offset wrt the 1st.
- Added 2nd extruder to bigtreetech-skr-3.cfg
- After the 1st HotEnd is Z aligned... tbd
- ToDescribe: XY offset determination of extruder 2 wrt extruder 1 using kTAVM
- There are only XY offsets for the 2nd extruder. Set the offsets to 0.0 when you change from tool !!!
-
Files:
- TBD.
How to determine the gcode offsets in X and Y for the Z probe and/or toolheads with and for Klipper.
Notes:
- Updating rotation_distance to a new value: newValue = oldValue x (measuredDistance/expectedDistance)